Many times when we use Photoshop, or when we just download and install it, the default version is English , or we download versions in other languages, which looks very unfamiliar at first glance. The following detailed tutorial will help you quickly set it back to your country’s language.
1. Preset language through Creative Cloud desktop app (applicable if Photoshop is not installed)
- Launch the Creative Cloud desktop app
First, open Adobe’s official Creative Cloud desktop client (all Adobe software currently needs to be installed and managed through this application, so make sure you are logged in to your personal Adobe account).
- Go to Account Preferences
Click the “Account” icon in the upper right corner of the application (usually a circular avatar/account name logo), select “Preferences” in the pop-up drop-down menu, and open the settings dialog box.
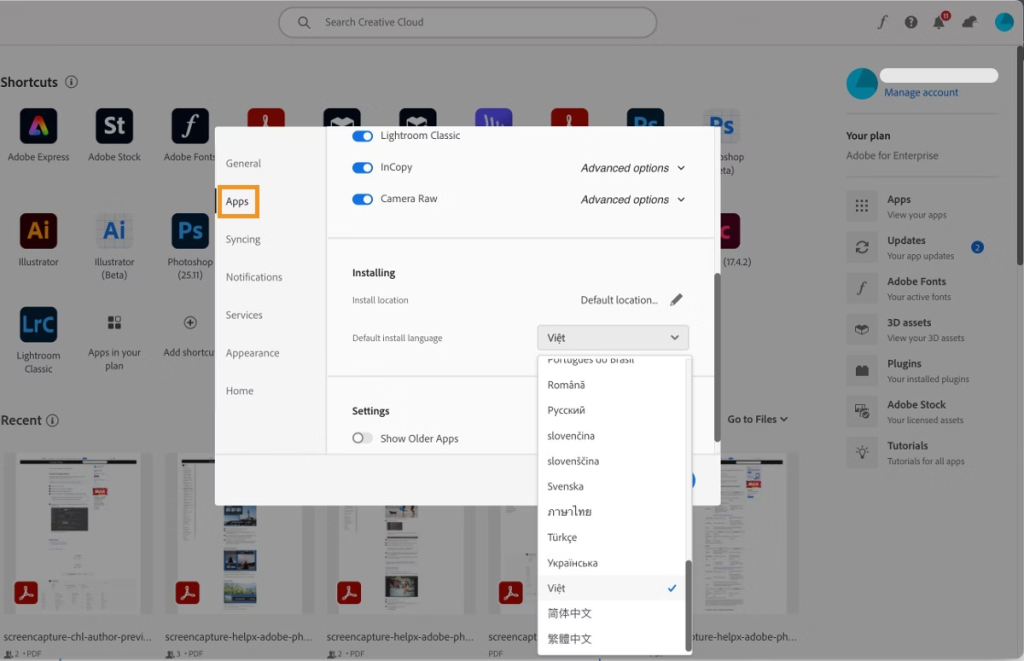
- Select the application settings interface
In the left navigation bar of the “Preferences” dialog box that pops up, find and click the “Application” option to enter the software installation related settings page.
- Set the default installation language
On the “Application” settings page, find the “Default installation language” drop-down list and select the target language you need (such as Simplified Chinese, English, etc.). After selecting, click the “Done” button in the lower right corner to save the language setting.
If you then install Photoshop through Creative Cloud, it will launch in your chosen language without any additional adjustments.
2. How to change the language after installing Photoshop
- Uninstall and reinstall Photoshop (for scenarios where you need to completely switch languages )
If Photoshop is already installed, you need to first find the installed Photoshop in the “Apps” list in Creative Cloud, click “More Options” (three-dot icon) on the right, select “Uninstall” and follow the prompts to complete the operation; after the uninstallation is complete, return to the application list and click “Install” again. The software will now be installed in the language previously preset in Creative Cloud. After the installation is complete, you can use the target language when you launch it.
- Adjust the interface language directly in Photoshop (suitable for quickly switching scenes )
If you don’t want to reinstall, you can adjust it directly in the launched Photoshop:
① Open Photoshop and click “Edit” (Windows) or “Photoshop” (Mac) in the top menu bar. Select “Preferences” in the drop-down menu, and then click the “Interface” option;
② On the “Interface” settings page, find the “User Interface Language” drop-down menu and select the language you want;
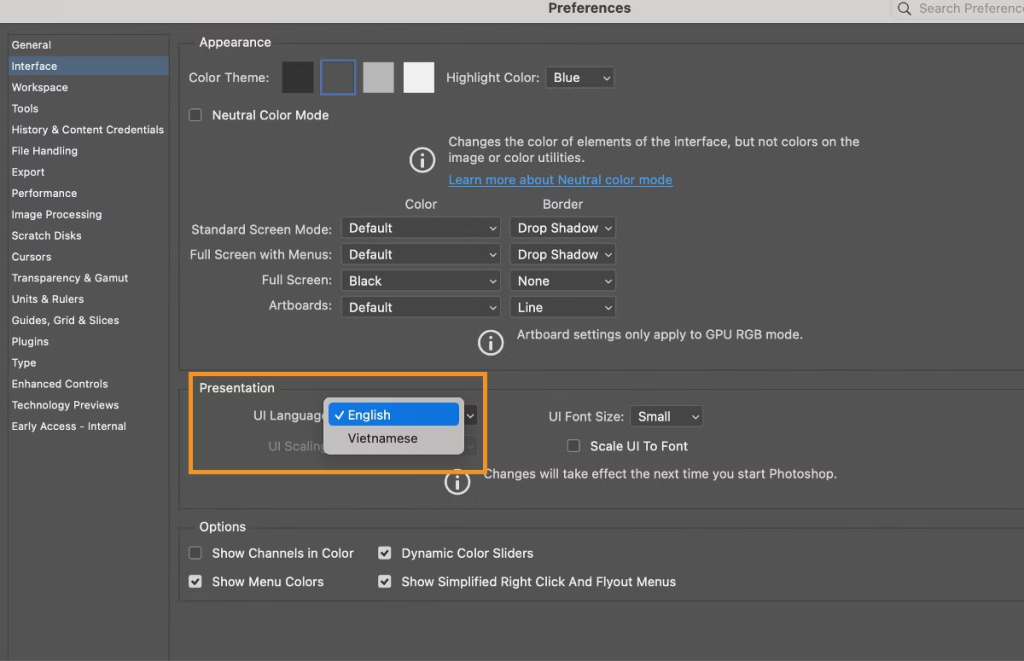
③ After making your selection, click the “OK” button. A prompt will pop up saying “Software needs to be restarted for the change to take effect.” Close Photoshop and restart it. The language change will then be fully applied.
3. Notes
- After changing the language setting, make sure Photoshop is completely closed (including background processes) before restarting it to avoid the setting not taking effect due to the process not exiting;
- For some special language packs (such as minority languages), you may need to ensure that Creative Cloud has loaded the corresponding language resources. If the target language is not in the drop-down list, you can update Creative Cloud to the latest version and try again.
6. For the changes to take effect, you need to restart the Photoshop application after selecting the language.
Comments0